Encountering hail damage can be stressful, but knowing the right steps to take can make a big difference in protecting your property and ensuring efficient repair. This guide will walk you through the essential actions to take after a hailstorm has left its mark, offering practical advice and easing your worry.

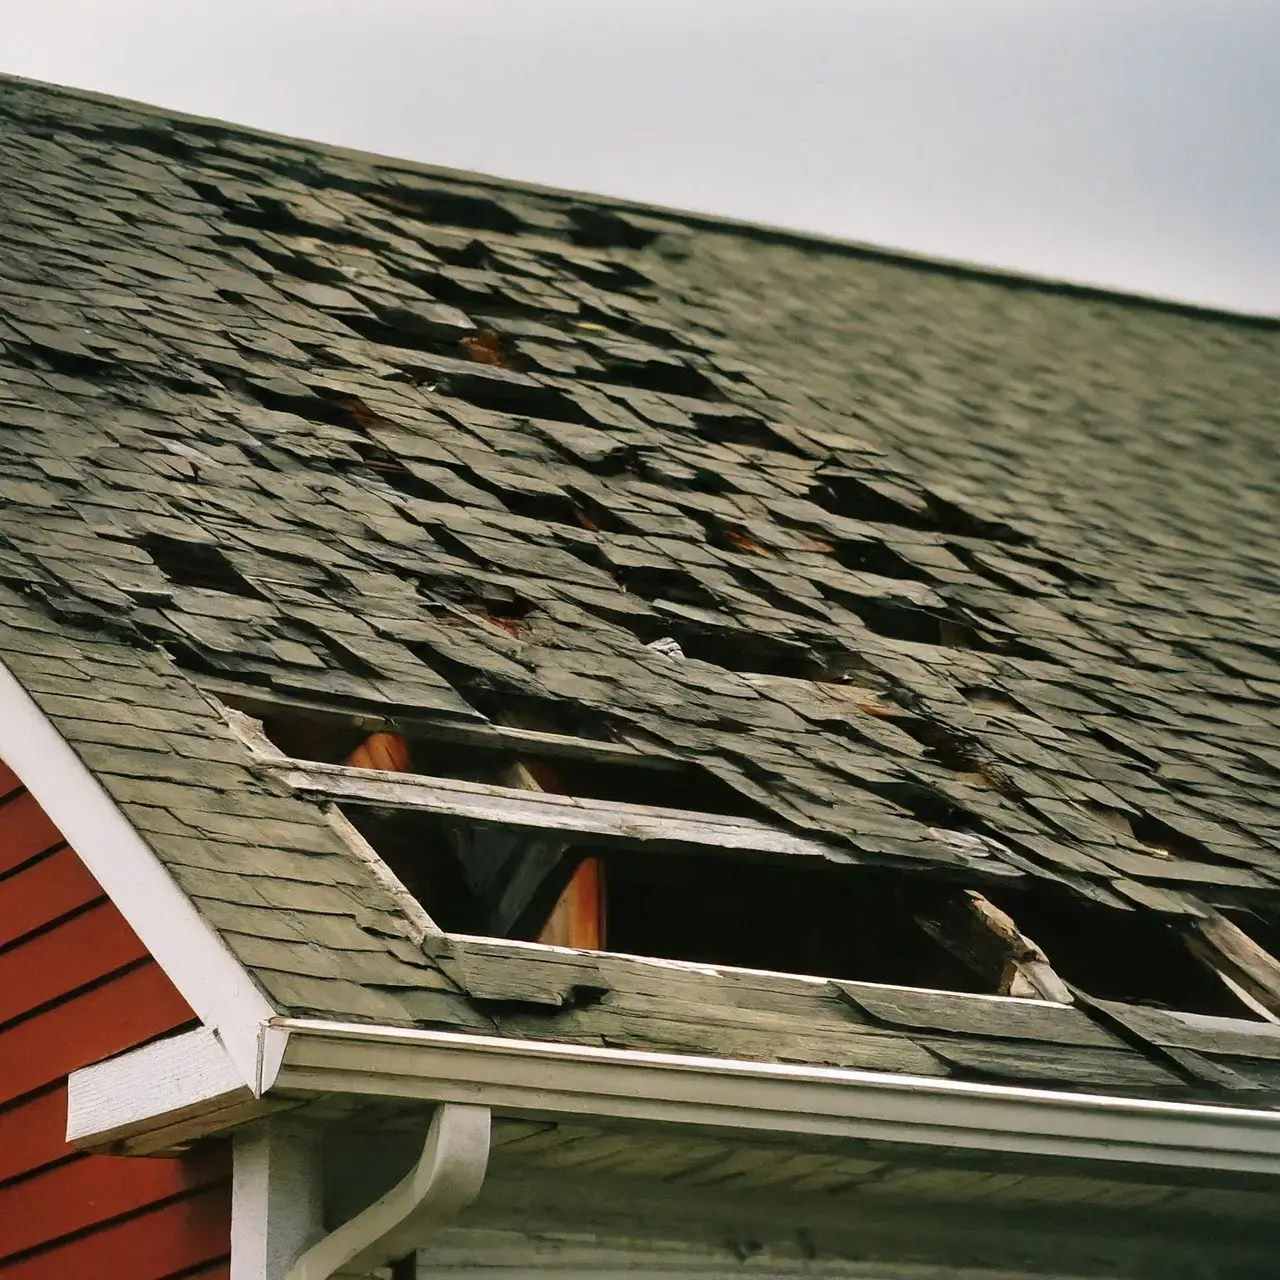
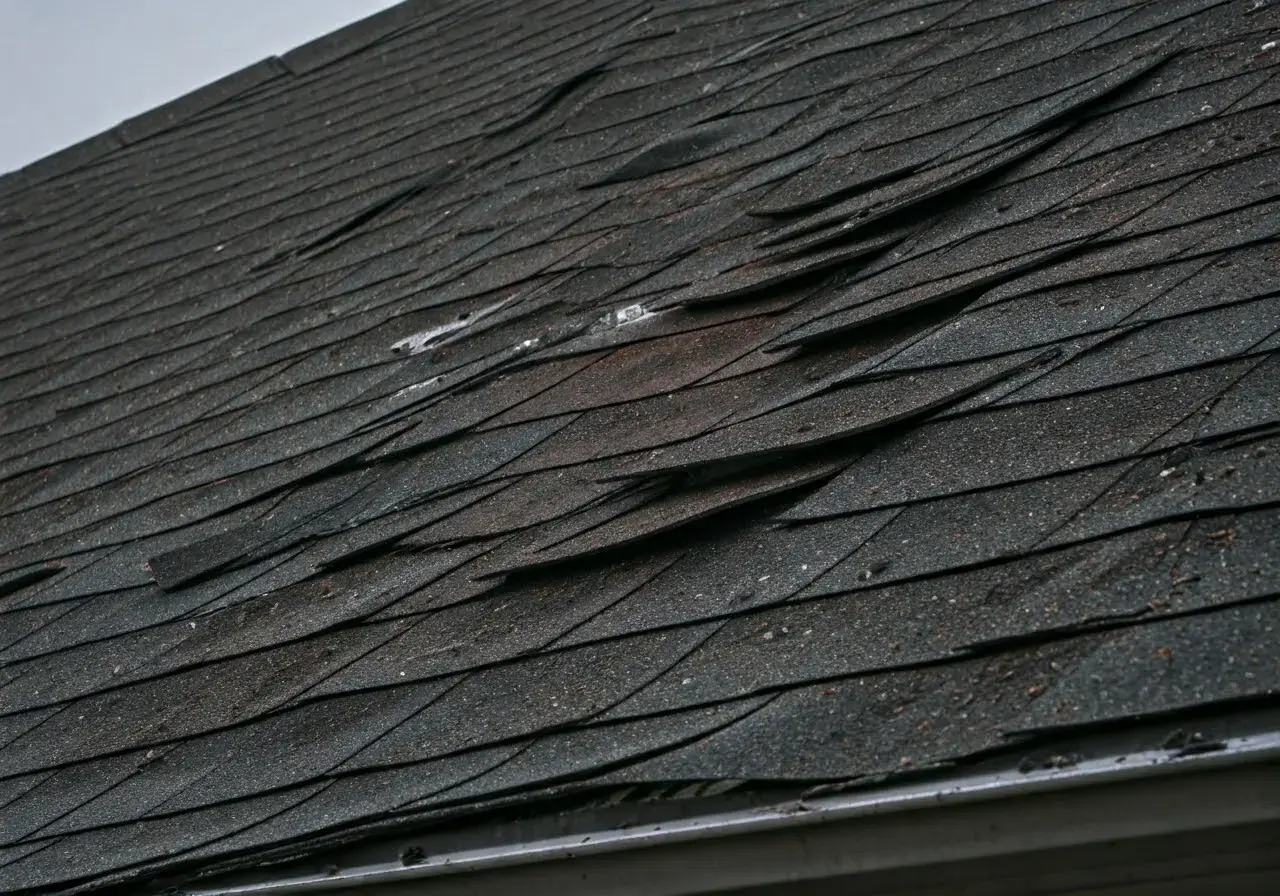
1. Assessing the Hail Damage
Begin by surveying your property carefully to evaluate the extent of the damage. This initial assessment helps in planning the necessary repairs and understanding the gravity of the situation. Walk around the exterior of your home to inspect the siding, windows, and doors. Look for visible signs such as dents, cracks, or shattered glass. It’s also wise to check your garden for telltale signs like tattered flowerbeds or displaced outdoor furniture, which can indicate the storm’s severity.
Inspect the roof from a safe distance. Leverage binoculars if necessary to see if the shingles have missing granules, cracks, or bruises, which are common aftermaths of a hailstorm. If you notice debris around downspouts, it might signify roof damage. Always remember—safety first; avoid climbing onto the roof yourself, especially right after a storm when it may be slippery or unstable.
2. Prioritizing Immediate Safety
Ensure that any immediate safety hazards, such as broken glass or loose power lines, are addressed first. Keeping everyone safe is the top priority before proceeding with repairs. Enforce a safe perimeter around dangerous areas and consider wearing protective gear when near unstable structures. Broken trees or large branches hanging precariously close to your home should also be dealt with promptly—perhaps with the help of a professional tree service.
Inside your home, check that exposed areas are covered temporarily with tarps or plywood to prevent further water infiltration. This is crucial if more rain is expected before repairs can be made. Important documents or electronics should be relocated from any potentially damaged areas to avoid water or moisture damage.
3. Documenting the Damage Thoroughly
Take clear photographs and detailed notes of all affected areas. This documentation will be essential when communicating with insurance companies or repair services. Capture images from multiple angles and distances to ensure every nuance of damage is visible. Snap shots both from the outside and inside your home, especially capturing water spots or leaks that could indicate deeper issues.
Create a list or a file where you collect all receipts or invoices from any emergency supplies bought or temporary repairs made. Having a systematic record not only supports your insurance claim but also ensures you keep track of potential expenses needing reimbursement.
4. Understanding Your Insurance Policy
Review your insurance policy to know what’s covered and understand your deductible. Being informed about your coverage will aid in efficient communication with your insurer. Look for specific clauses about hail or storm damage, and note any exclusions or special conditions regarding coverage continuity and the filing timeline.
Remember that policies might vary greatly across different providers and plans, so if any part of your coverage is unclear, it’s best to contact your agent directly for clarification. This step will save time and help avoid any unnecessary headaches when it comes time to file your claim.
5. Contacting Your Insurance Company
Reach out to your insurance company promptly to report the damage. Providing them with all necessary documentation helps speed up the claims process. Be prepared to describe the damage and its extent and have your policy number readily available.
Many insurance providers offer online portals or mobile apps for quick and easy claim filing. These tools often allow you to upload photos and documents directly, streamlining the process. If your provider doesn’t offer digital submission, you may need to schedule an in-person assessment.
6. Choosing the Right Repair Professionals
Research and select reputable repair contractors who specialize in hail damage. Ensure they are licensed and insured for peace of mind during the repair process. Reading reviews online and asking for local referrals can provide insight into the quality of service you can expect.
Another layer of guarantee is to verify if potential contractors provide warranties for their work. This not only protects you but also demonstrates the contractor’s confidence in their repair work to withstand future weather challenges.
7. Understanding Repair Estimates
Review repair estimates carefully, considering both quality and cost. It’s important to balance these factors to ensure a satisfactory repair. Detailed estimates should outline all the necessary repairs, costs for labor, materials, and any other additional fees. Don’t hesitate to ask for clarifications if certain charges seem vague or unexpected.
Many homeowners find it beneficial to get multiple estimates from different contractors. Comparing these can provide a clearer picture of the market rate and prevent overcharging.
8. Scheduling and Coordinating Repairs
Organize the repair schedule to minimize disruption. Coordination between your insurance, contractors, and you is key to a smooth process. Allow a buffer for potential delays due to weather or resource availability, which can often impact repair timelines.
Keeping open channels of communication between all parties involved ensures everyone is on the same page. This includes alerting your repair team to any specific timing constraints you might have, such as work from home requirements or upcoming events that could impact repair activities at your residence.
9. Overseeing the Repair Process
Stay involved during the repairs to ensure everything stays on track and that any issues are promptly addressed. Being present when major or delicate repairs occur helps ensure that the work aligns with your expectations.
Join in progress updates with the contractors to foresee and mitigate unforeseen issues. Continuous oversight can discourage corner-cutting and promote adherence to safety standards and agreement specifics. This vigilance ensures the scope of work reflects accurately on the final invoice.
10. Reviewing Completed Work
Once repairs are complete, thoroughly inspect the work done. Make sure it meets the standards you expect and your insurance covers. Testing repaired areas, such as attic spaces post-roof repairs or basement corners post-flood repairs, can ensure they don’t imminently revert to damaged states.
It could be helpful to bring in a third-party inspection service to document the integrity of the work completed, lending another professional viewpoint for your peace of mind. This additional backup could be invaluable in raising any potential disputes should problems arise later.
11. Keeping Records of All Transactions
Maintain detailed records of all communications, contracts, and payments. This trail is essential for any future reference or disputes. Retain all digital communication as it provides a date-stamped historical account of dialogues. Additionally, ensure contracts are counter-signed with all relevant dates clearly marked.
Preserve hard copies of paid bills and receipts in a dedicated file for ease of access. These meticulous records will help bolster any claims or address any service discrepancies with full transparency and clarity.
12. Planning for Future Storms
After repairs, consider measures to mitigate future damage, such as installing hail-resistant materials or updating your insurance. Choosing options like reinforced roofing materials can diminish damage extent in subsequent hailstorms.
Additionally, evaluating your property’s current storm readiness and devising an upgrade plan aligns better with newer, more resilient protection methods. Engaging with experts for guidance on installing protective storm shutters or optimizing landscape drainage can proactively ward against future destructive forces.